Ok so my new stock Swiss lace hair system has arrived and I am still a bit stuck with how to resize the base properly.
I'm using my template and a styrofoam mannequin hairdressing head. I figured it'd be easier to cut round the template, as Curtis from MHE does. So I attached the template and system to the mannequin head using ball head push pins (upside down so it's easier to do, as you can see from the pics).
I have a small sharp embroidery scissors and a sharp scalpel craft knife that I bought from a craft/hobby shop, and I've tried gently cutting part of the lace round the template. However I have figured out there will be a problem - even if I trim the lace all the way round the back and sides, the lace that has been cut will still have hair attached to it. How do I solve this?
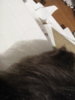
As an example of what I mean, please see the first pic in the list below. It's of the left side of the system. As you can see, the base is way bigger than my template so needs the be trimmed to fit. You'll also see I've made a slight cut to the lace on the left side of the system, but the area that I point to with the red arrow in the pic still has hair attached to it even when I cut the lace round the template.
To make matters more confusing, some videos I've watched talk about how you have to use a tail comb to 'pull the hair back behind the line so you don't accidentally cut off the hair off'. But there is a video from Lord Hair were they teach the same technique but then they DO cut the hair off below the parting.
So which is it? Do I cut only the lace below the parting, or the lace and the hair? Because both the following videos contradict each other:
So I'm really confused. Can anyone explain how to do this in plain English? I can't afford to mess this up as this is the 2nd system I've bought since December last year and I need to get this one right! I want to keep the hair on this system the full length (6 inches) as I have longer hair.
Below are also several other pics of my new system and template attached to the mannequin head.
I'm using my template and a styrofoam mannequin hairdressing head. I figured it'd be easier to cut round the template, as Curtis from MHE does. So I attached the template and system to the mannequin head using ball head push pins (upside down so it's easier to do, as you can see from the pics).
I have a small sharp embroidery scissors and a sharp scalpel craft knife that I bought from a craft/hobby shop, and I've tried gently cutting part of the lace round the template. However I have figured out there will be a problem - even if I trim the lace all the way round the back and sides, the lace that has been cut will still have hair attached to it. How do I solve this?
As an example of what I mean, please see the first pic in the list below. It's of the left side of the system. As you can see, the base is way bigger than my template so needs the be trimmed to fit. You'll also see I've made a slight cut to the lace on the left side of the system, but the area that I point to with the red arrow in the pic still has hair attached to it even when I cut the lace round the template.
To make matters more confusing, some videos I've watched talk about how you have to use a tail comb to 'pull the hair back behind the line so you don't accidentally cut off the hair off'. But there is a video from Lord Hair were they teach the same technique but then they DO cut the hair off below the parting.
So which is it? Do I cut only the lace below the parting, or the lace and the hair? Because both the following videos contradict each other:
So I'm really confused. Can anyone explain how to do this in plain English? I can't afford to mess this up as this is the 2nd system I've bought since December last year and I need to get this one right! I want to keep the hair on this system the full length (6 inches) as I have longer hair.
Below are also several other pics of my new system and template attached to the mannequin head.
Last edited:


")